Search Projects

Sunday, August 26, 2018

OpenGL Chess Board in C++ with Source Code

Chess is interesting game with 8X8 checker of black and white. Hence we are going to see a program in OpenGL that implement Chess Board in C++ with free Source Code.

This program implements with the three functions:

1. Init function - this initalise the opengl program.
2. Chess Boards - this calculate the chess and sqaure and draw the same in the screen.
3.  Main function - this is the must and common program for each and every oepngl program.

chessboard() this function is used for the calculation of the end point of the cordinates of the box to make and is also mainly responsible for calling the drawSquare()
It is also a display function which is called from the main function which is responsible for sending graphics to the display window.

The forming of boxes is made through iterating first of all from 1st row and making 1st column then 2nd and then till 8th column as a single chessbord contains 8 column.

The similiar above operation is repeated till all the 8 rows have been iterated making a total 64 boxes (8 rows and 8 column).

The finally the chessboard() function contains a opengl glFlush()  which process all opengl routine as quickly as possible means it flushes all the matter on the display window for the next display.

This similar to our earlier chess board opengl program.

USE OF THE PROGRAM:

        The program OpenGL Chess Board in C++ can be use in the chess board game as well as in making the floor of the house or any other structure.

Source Code : 


#include<windows.h>
#include<glut.h>
int c = 0;
void init()
{
// For displaying the window color
glClearColor(0, 1, 1, 0);
// Choosing the type of projection
glMatrixMode(GL_PROJECTION);
// for setting the transformation which here is 2D
gluOrtho2D(0, 800, 0,600);
}

void drawSquare(GLint x1, GLint y1, GLint x2, GLint y2, GLint x3, GLint y3, GLint x4, GLint y4)
{
// if color is 0 then draw white box and change value of color = 1
if (c == 0)
{
glColor3f(1, 1, 1); // white color value is 1 1 1
c = 1;
}
// if color is 1 then draw black box and change value of color = 0
else
{
glColor3f(0, 0, 0); // black color value is 0 0 0
c = 0;
}

// Draw Square
glBegin(GL_POLYGON);
glVertex2i(x1, y1);
glVertex2i(x2, y2);
glVertex2i(x3, y3);
glVertex2i(x4, y4);
glEnd();
}
void chessboard()
{
glClear(GL_COLOR_BUFFER_BIT); // Clear display window
GLint x, y;

for (x = 0; x <= 800; x += 100)
{
for (y = 0; y <= 600; y += 75)
{
drawSquare(x, y + 75, x + 100, y + 75, x + 100, y, x, y);
}
}
// Process all OpenGL routine s as quickly as possible
glFlush();
}

int main(int agrc, char ** argv)
{
// Initialize GLUT
glutInit(&agrc, argv);
// Set display mode
glutInitDisplayMode(GLUT_SINGLE | GLUT_RGB);
// Set top - left display window position.
glutInitWindowPosition(100, 100);
// Set display window width and height
glutInitWindowSize(800, 600);
// Create display window with the given title
glutCreateWindow("Chess Board using OpenGL in C++");
// Execute initialization procedure
init();
// Send graphics to display window
glutDisplayFunc(chessboard);
// Display everything and wait.
glutMainLoop();
}

Wednesday, May 9, 2018

AirPlane Game Computer Graphics Project

In our blog we have seen many projects that deals with gaming. Today we are introducing one of the most complex game which we called the "AirPlane Game". It is not similar to copter game in openGL we have seen earlier. It is more complex and used SOIL.

Objective :

The objective of the project is to built a game using opengl and c++, which use the airplane as tool of game. The Computer Graphics game Project use playing have to run the airplane through the scene avoiding the danger as well as keeping the fuel up. As the fuel goes down user game ends, same when you hit by incoming object.

Features : 

1. Splash Screen 
2. Options to Choose the plane
3. Option to choose the scence
4. Different menu as mentioned below.

A menu with screen with the following items: 

• Play 
• Settings 
• Instructions 
• Credits 
• High Scores 
• Exit 

The game use SOIL to load the image hence you have to first set the soil in your project. 

For source code and documents email to openglprojects@gmail.com

Friday, April 6, 2018

OpenGL Code Traffic Signals

Presenting to you another OpenGL Code on Traffic Signals. We have already seen the Advance Traffic Signal OpenGL Program, now we will see another good program for same.


OpenGL Code Traffic Signals

Features 

The OpenGL Code  we presenting have many of the good features. Some of the features is listed below -

  1. Light Options - As in any traffic signal you will see the three lights - red, yellow and green. All the options has been implemented.
  2. Vehicles - To keep the OpenGL Code simple for all only three vehicles has been added. Though, if you like to add more do it, you are welcome.
  3. Lanes -  The right and left lane options is implemented in the program.
  4. User Interactions - Both mouse and keyboard interaction has been added to the OpenGL Code. All the user interactions has been listed in the post below.
  5. There is options to speed up the traffic is also in the code.
  6. Program has include the front page for introduction.

User Interactions

As mentioned earlier both mouse and keyboard user interaction has been added to this OpenGL Code. 
  • Keyboard Interactions
  1. Enter - From First Introduction screen to screen press Enter key at beginning.
  2. Help -  Press 'h'to get the help screen.
  3. Left to right movement - press 'l' to allow only left to right movement of traffic.
  4. Right to left movement - press 'r' to allow only right to left movement of traffic.
  5. Speed up - To speed up the traffic press 's'.
  • Mouse Interactions
  1. Left Mouse Button - This will stop the traffic as Red light gets on.
  2. Right Mouse Button (on hold) - Press right mouse button and keep on hold for yellow light. 
  3. Right Mouse Button (released) - After releasing the right mouse button the light changes from yellow to green and traffic moves.

Video Demo


Downloads

You can download the OpenGL Code from the Google Drive link.

Tuesday, April 3, 2018

Simple Travelling Salesman Problem (TSP) OpenGL Graphics Program

Many students looking for OpenGL Graphics Program for Travelling Salesman Problem (TSP), so we came up with it.

What is Travelling Salesman Problem (TSP)?

The Traveling Salesman Problem is problem where a traveler (or salesman) have to visit given no of cities, with known distance. Salesman have to visit each city once with and return to origin city with shortest possible distance.

The TSP is np-hard problem, where we have to optimized all the possible combinations.

Solutions

How to solve this problem?

In Computational world we solve this problem with two techniques - 1. Brute Force Approach and 2. Dynamic Programming.

1. Brute Force Approach - If we have n, no of cities then by brute force approach we will get (n-1)! permutations. We calculate cost (distance) of every permutation and record minimum cost for it. Finally return the permutation with minimum cost.  The time complexity for this method is n!.

2. Dynamic Programming - In this method we create the cost matrix and find the minimum cost.

Read the Dynamic Programming Approach for TSP.

Our Travelling Salesman Problem OpenGL Program

In our program we have restricted ourself to a maximum of 10000 cities. So, at begining user have to input the no of cities subjected to restriction, as mentioned. Each cities are represented as points. Lines joining the cities represent the distance. In initial setup the program creates sequence from the input, then distance is calculated. The swap and iterations are performs on the cities to find out the minimum distance.

You can see the image below - 


User Interaction

The initial distance is calculate at the beginning after user enter the no of cities in command line.
Next, there is two options for user -  key 's' and key  'a'.

When key 's' is pressed, two cities are selected randomly and swapped only when distance is minimum. This is performed as many times as 's' is pressed and distance calculated after swamp is shown in command line.

Pressing 'a', the swapping performed as many times for different cities(all). After performing each iterations the distance is shown in command line and finally it shows the minimum possible distance. Though this may not be the shortest path or minimum distance covered but optimal solution.  


Tuesday, March 13, 2018

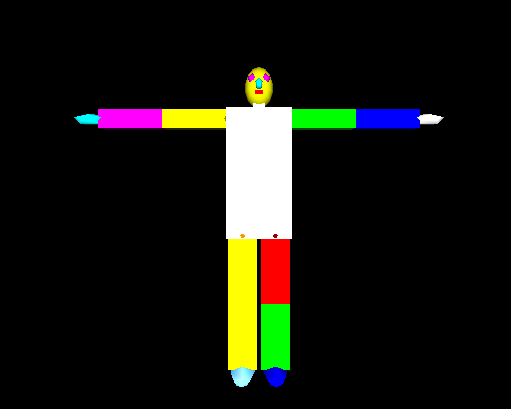
Robot Computer Graphics Program in C

OpenGL is amazing, it have potential of great stuffs from creating a small triangle to big structures. We have seen many robot program in OpenGL. Here we come with another robot computer graphics program in C with the use of OpenGL API.

Features 

  • A human features with hands,legs, neck, head and face drawn with simple approach.
  • A colorful robot with animation made.
  • A dat file created that used as input for certain restrictions which we can't hard code in program.
  • Four header files used -
    1. vars.h - It contains all the global variables used in the program. Also have dimension for the body if the robot.dat is unreadable or not present.
    2. file.h -  This header used for reading input from robot.dat file.
    3. keyboard.h -  As name suggests it contains keyboard input functions.
    4. mouse.h - Same as keyboard.h, it also have mouse input functions.
  • Program uses selection buffer to determine what body part was selected, the judging by button pushed and mouse movement, the proper transformation is executed.

Main Functions

main();                            read data file, initialize glut stuff
     init();                              lighting and material stuff, initialize matrices to identity
     display();                        glut display function (calls display_robot(rendermode))
     display_robot(mode);    call each of the body part functions
     reshape_window();       glut reshape function

     draw_body(mode);        draw the torso and neck
     draw_head(mode);        draw the head and face
     draw_leftarm(mode);     draw all of the left arm
     draw_rightarm(mode);    draw all of the right arm
     draw_leftleg(mode);     draw all of the left leg
     draw_rightleg(mode);    draw all of the right leg

Mouse Interface:
   To translate the robot (x, y direction): click the right mouse button on the torso,
      and drag it around the screen.  Once the button is released, the robot will move (in
      the direction of the vector from where the button was pushed to where it was released)
   To move the robot forward and backward (z direction):
      right click once on the torso to move it forward
      left click once on the torso to move it backward
      note: the amount which the robot moves in the z direction for each click can be
        adjusted using the '-' and '+' keys.  (default == 0.2), each adjustment is by 0.2
   
   To rotate body parts or the torso(about x or y axis):
      left click on the body part you want to rotate. (hold in the button)
        then drag the mouse the direction you want the robot to rotate.
        upon release of the button, the rotation will occur.
        (the amount of rotation is the distance of the drag (in pixels) mod 360)
   To rotate about the z axis:
      click and drag with the middle button.  the amount of rotation is determined
        by the horizontal change (mode 360)

Keyboard Interface:
   Rotations:  push 'q' for x axis, 'w' for y, 'e' for z
               push 'Q' for -x, 'W' for -y, 'E' for -z
               then choose the body part with, 0-9, 'o','p','[',']'
                  0-torso, 1- head, 2-leftupperarm, 3-leftlowerarm, 4-leftwrist
                  5-rightupperarm, 6- rightlowerarm, 7- rightwrist,
                  8-leftupperleg, 9- leftlowerleg, 'o'- left foot,
                  'p'-rightupperleg, '['-rightlowerleg, ']'-right foot
   Translation:
               use same q,w,e and Q,W,E for axis/direction selection
               then push 't' to translate
               use + and - to adjust the amount of translation


Thursday, March 8, 2018

Flag of USA

We have already seen two flags Programs  - OpenGL Flag Hoisting program with Our Indian Tricolor and OpenGL program on flag of South Africa. Today in this post we are going to see another flag program. This flag is about USA.

Challenges

Flag of usa have mainly two parts - one with pattern of stars other the stripes. While maintaining the ration of flag, the pattern has to be drawn in left corner and white and red stripes to rest of the flag. Another problem is the 7 stripes along side of star patterns are smaller in length, we have to keep in mind about it.

Approach

First thing is done by drawing the star with GL_TRIANGLE_FAN, using the proper coordinates and angles. Next we draw the pattern of stars using the for loop function with if else conditions, which determines the alternate between rows of five or six stars.

Define a int variable that holds the value of no of stripes(13). This helps in drawing the stripes in loop as well as determine the number of stripes left. This variable also helps in fixing the length of 7 smaller stripes. Alternate stripe colors is done using the if else, and odd even conditions in it. The GL_QUADS has been used to drawn the stripes.

Unlike our other flag programs here we are displaying the whole screen with flag only. Also there is no pole and no hoisting like we have in Computer graphics OpenGL Flag Hoisting program .  You can watch the video demo of this projects on Youtube.


Source Code

Shoot an email to openglprojects@gmail.com for the Source code of this OpenGL Program, we will sent instruction to get the source code.

Thursday, March 1, 2018

3D Martyr’s Monument -Shaheed Minar

A Very Good 3D Project on Martyr’s Monument (Shaheed Minar) Submitted by Nayeem. It is a 3D Computer Graphics OpenGL projects based on Bangladesh Shaheed Minar or Martyr’s Monument.

Note : - This Projects is submitted by Nayeem through the Submit Your Project which you can too submit as well.


Introduction:

Martyr’s Monument (Shaheed Minar) is based at Dhaka, it was projects idea of teacher of Nayeem from Ahsanullah University of Science and Technology Dept. of Computer Science and Engineering. It is wonderful projects based on the ideal martyrs monuments. It is also a tribute for martyrs and to remember them by laying down flowers to the Martyr’s Monument.

Tools:

For this lab Project, they have used the OpenGL 3. The GLUT library has bee used to access OpenGL function. The basic concept from OpenGL which envolve this 3D Martyr’s Monument project are as follows -
  • Transformation
  • Timer
  • Color
  • Lighting
  • Textures
  • 3d text


Feature: Now we will discuss about the features of this project which are as following -

  • The project showcase the Shaheed Minar Structure of Dhaka with the perfect scale.
  • The structure was design this architecture with perfection with compute graphics using opengl.
  • Different texture like grass, sky and tiles used in this program to give more realistic look.
  • There are two mode in the project which show the structure in Day and Night Lighting combination.
  • There is an option to rotate Shahid Minar at 360o.
  • It also have text display in 3D.

  • Obstacle:

    The main Challenge in completing the project was to find the right coordinate to draw plane for object surface. It was really very challenging finding original coordinate display it perfectly.

    Future work:

    • Add City View and flower dropping on base.
    • Add many peoples around the structure who pay homage by flowers etc.
    • Add boundary and other stuffs.
    • Add more animation to the project.
    • Add sound and music to the project.


    Download:

    You can download the source code of the project from Github as well as report from there.


    Saturday, February 10, 2018

    Space Invaders Freeglut Project

    C++ graphics program enrich with many development in the technology. Opengl graphics library is one of them that lead to the vast improvement in the computer graphics programming with free apis. Glut The OpenGL Utility Toolkit is a library of utilities for OpenGL programs. We have many program like Flag hoisting C++ program utilize the use of Glut. There is an alternative to Glut, called Freeglut. In this post we will have a program using freeglut. The is named as Space Invaders.


    What is Freeglut?

    FreeGLUT is an alternative to the OpenGL Utility Toolkit (GLUT) library, the open source alternative. GLUT (and hence FreeGLUT) allows the user to create and manage windows containing OpenGL contexts on a wide range of platforms and also read the mouse, keyboard and joystick functions. FreeGLUT is intended to be a full replacement for GLUT, and has only a few differences.

    Since GLUT has gone into stagnation, FreeGLUT is in development to improve the toolkit. The origninal writer of Freeglut is Pawel W. Olszta. Andreas Umbach and Steve Baker has made significant contribution to Pawel for freeglut.

    Space Invaders Freeglut Project

    1. This program is similar to other opengl computer graphics programs, where we will use the freeglut libraries instead of glut. <GL/freeglut.h> is replacing <GL/glut.h>
    2. The program starts with splash screen, which uses the textures to display the strings. There is separate file used to write the code for the textures.
    3. This is a game project, where there is a aircraft loaded with weapons. Use the gun to target the enemy before the heap crosses the safeline.
    4. Each shot with accuracy give the points to player. Score is displayed as well as overall high score .
    5.   Game have different options to choose from like play, exist and choose the difficulty levels.


    Glut and Freeglut

    This program can be used with the glut as well. Instead of using <GL/freeglut.h> use <GL/glut.h>. Also if some error persist,use the glut alternative  of freegult. 

    You can download the source code as well as the textures c code without any guaranty. 

    The source code is hosted out of our control, hence we disclaim to any liabilities arose due to use of the code. The copyright is hold by owner as stated in the source code, we govern with the same.We congrats the writer to provide us such a wonderful projects in freeglut.