Search Projects

Thursday, December 31, 2015

Cursor Position OpenGL Code Blocks Example

In the previous post in our blog, we have posted about OpenGL mouse position, in similar way today's post we are going to have tutorial about Cursor Position in OpenGL.

Cursor Position OpenGL Code Blocks Example

Do you Know about Code::Blocks?

There are many IDE for C/C+, Like same Code::Blocks is one of the IDE for C/C++/FORTRAN. Built around a plugin framework, Code::Blocks can be extended with plugins. Any kind of functionality can be added by installing/coding a plugin. For instance, compiling and debugging functionality is already provided by plugins!

Cursor Position OpenGL

The coordinate of screen in the OpenGL window starts from upper left corner and we determined the mouse position in same we determine the cursor position in OpenGL. In this post wear going to learn how to get cursor position in screen coordinates. This example is done with Code::Blocks, but can be run on different platforms with little/no modification.

In this post we are going to learn an OpenGL Code Blocks Example of determining the cursor position.

Objective of Program  : Show the position of cursor in c++ using the OpenGL graphics library.

Step By Step Process

Step 1: Create variable that will determine the both X, Y Coordinate of cursor as well as the windows. The code for this as given below - 

GLint x = 10;
GLint y = 20;
GLint WindowWidth = 800;
GLint WindowHight = 600; 

You may change the values!

Step 2 : In each of the OpenGL program we have used the init and Display functions. Hence also we are going to use the same OpenGL Code Blocks Example, with minimal code. These codes are needed in almost all the programs. Find out the use of each functions at OpenGL.org. In our display function we are going to fix the size of the point as well. The Display function will enable us to draw a small square where the cursor position id determined. 

void init()
{
    glClearColor(1, 1, 1, 0);
    glMatrixMode(GL_PROJECTION);
    gluOrtho2D(0, WindowWidth, 0, WindowHight);
}
void display()
{
    glClear(GL_COLOR_BUFFER_BIT);
    glPointSize(20);
    glFlush();
}

Create a Mouse Function

Step 3 : In our mouse function we will determine the cursor position with the left mouse button.  We will check the status of left mouse button, whether it is pressed down or not. Hence we will draw a point when the left mouse button have the status of it's state=down. This determine the coordinate of screen and we know the position of cursor.

As we know that in opengl the coordinate are from upper left corner, so we need to anti alias the y coordinate. Rest of the logic is simple take the position of x and y and create the point there with specified color.

void mouseHandler(int button, int state, int mouse_x, int mouse_y)
{
    if (button == GLUT_LEFT_BUTTON && state == GLUT_DOWN)
    {
        x = mouse_x;
        y = WindowHight - mouse_y;
        // Set line segment color as glColor3f(R,G,B)
        glColor3f(0.5, 0.5, 0.9);
        glBegin(GL_POINTS);
        glVertex2i(x, y);
        glEnd();
        glFlush();
        // Clear display window
        glClear(GL_COLOR_BUFFER_BIT);
    }
}

Step 4 : Main is to be code which is same for the program as all other programs have.

We hope you liked this OpenGL Code Blocks Example, put your suggestion, opinions in the comment below. Watch video below!

How to setup OpenGL in CodeBlocks

SETTING UP OPENGL IN CODEBLOCK
First of all download and install the CodeBlock on your computer from the official website http://sourceforge.net/projects/codeblocks/files/Binaries/13.12/Windows/codeblocks-13.12mingw-setup-TDM-GCC-481.exe/download
After downloading this setup install it on the computer.
Now you have to configure it for the opengl development.
First of all download the freeglut libraries,headers,and system files from the link given below
http://www.mediafire.com/download/b4s0y548eobb5a0/codeblock_freeglut.rar

After downloading this folder it should contain three folders like as shown
 P1Ccfolderdes

Now you have to copy these all three folders and paste it to the given path C:\Program Files (x86)\CodeBlocks\MinGW as shown
P1CCcopyfolderstomingw

It will ask for the either replacing the existing files or not you have to select ok for merging the files with the same name.
Now 50% work here is done Now copy the dll file from the downloaded folder in the bin folder as shown
 P1Ccfreeglut.dll

Paste the above dll file to the following path C:\Windows as shown
 P1CCwindowsfreeglut.dll

Now you have to change the configuration files because first they are set for the glut32 and now we have to change them to freeglut libraries
Open notepad with administrator previledges as shown
 P1CCnotepad

Go to File->Open and select the path as given C:\Program Files (x86)\CodeBlocks\share\CodeBlocks\templates\wizard\glut as shown P1CCwizardglut
Click on the script and press OK for changing the content inside the file and change the content glut32 to freeglut as shown. Find once more if glut32 is present or not if present then change that also to freeglut.
 p1CCglut32tofreeglut

Again open an another file in the notepad open with administrator previledges.Go to the path Go to File->Open and select the path as given C:\Program Files (x86)\CodeBlocks\share\CodeBlocks\templates and open the filenamed cbp and find the term “glut32” and replace it with “freeglut” after the final changes it should look like as shown
 P1CCtemplatechange

Now everything is done. Open CodeBlock and open a new Project and select GlutProject after giving it a project name press next now you have to give its path name as C:\Program Files (x86)\CodeBlocks\MinGW as shown
 P1CCpath

You will get a default opengl code now just press compile and run button that will give you following window as shown

How to install OpenGL Glut in Dev C++

SETTING UP OPENGL IN DEVC++

First of all install the Dev C++ while downloading it from the official website the latest version http://orwelldevcpp.blogspot.co.at/
After downloading it install with the normal configuration. When the installation is done. Open Dev C++.
Go to File->New->SourceFile  you can directly hit the keyboard shorcut Ctrl+N.
Now you have to download the glut files(Library, Header and System files) which can be obtained directly from the link described here.
http://www.mediafire.com/download/fwn0j0n123hn6e1/glutming.rar
Now Unzip the downloaded which will contain three files as shown.

Now you have to put these files to their appropriate places so let do it.
Take glut.h from the downloaded folder and copy it into the path  C:\Program Files (x86)\Dev-Cpp\MinGW32\include\GL  as shown.

Take libglut32.a file from the downloaded folder and put it in the path C:\Program Files (x86)\Dev-Cpp\MinGW32\lib as shown.

Now finally the system file take glut32.dll and copy to the path C:\Windows\System32 as shown.

Before compiling the program follow this last step.
Go to Tools->Compiler->General Tick the following as shown and write this line in the textarea -lglu32 -lglut32 -lopengl32 as shown


Finally compile and run the file you will get the following output as shown.
Updating with Code and image stay tune

Sunday, December 27, 2015

Connect Dots - OpenGL Mouse Position Example

An interactive project features the use of mouse function. Today we are going to have a project based opengl mouse position. The name of projects is - "Connect Dots".

opengl mouse position example

1. About the Project

This c++ opengl project is based on mouse click position. The theme of project is - draws straight lines connecting dots placed with mouse clicks. First one point is drawn on mouse click, next mouse click will draw a point while connecting it with previous point. This process of connecting points will continues till the max allotted points slots is over, after which first point will get deleted as new point is generate, this continues.

2. Opengl mouse click position 

Problem of the project is getting the position of a user mouse click in C/C++ & GLUT (OpenGL). Solution to this is in our myMouseFunc() function. We will typically pass the parameter to this function while adjusting the algorithm as per our requirement. In our mouse function, will condition to check if only left mouse button can create the point. Similarly only on mouse press down, the point to be generate so we use another condition for it. Logic for both is given below -

 if ( button==GLUT_LEFT_BUTTON && state==GLUT_DOWN ) {}

Next is to create logic for what happen when a left mouse button is pressed. We need to record the opengl mouse position (mouse coordinate). In variables will store the both x, y values of opengl window coordinates. These coordinates are further normalized by dividing with height and width.

float xPos = ((float)x)/((float)(WindowWidth-1)); float yPos = ((float)y)/((float)(WindowHeight-1)); 

Since the Position in OpenGL is define from upper left corner so we need to flip the position of 'y' coordinate as given -

 yPos = 1.0f-yPos;

The coordinate of opengl mouse click position is know, we will draw the point. A function call back is done so a point is added while left mouse is clicked.

addNewPoint( xPos, yPos );

3. Draw Lines to Connect Points 

In display callback function we code to draw the line segments. The lines segment can be drawn only when there is two points, hence we check if there is two or more points. The coordinate of the points will be stored in a two dimensional array. We will draw the lines with use of a loop, so each of the two points are connected with a line segment.

if ( NumPts>1 ) { glBegin( GL_LINE_STRIP ); for ( i=0; i<NumPts; i++ ) { glVertex2f( PointArray[i][0], PointArray[i][1] ); } glEnd(); } Our line are ready to display but where are points? For them we need not to check any condtion. We will use the array and simply display the points. glBegin( GL_POINTS ); for ( i=0; i<NumPts; i++ ) { glVertex2f( PointArray[i][0], PointArray[i][1] ); } glEnd();

The color of the points and the lines can be given in this function to whatever desired.

[next]

4. Rendering of Points and Lines

We get the Opengl mouse click position, draw the points and connected them with lines. Now times is to give a little customization by rendering these opengl objects. If we will define the size and width of our points and lines.

glPointSize(8);
glLineWidth(5);

The size and width can be passed as above but we need to give a proper shape to our points. We will implements the anti-aliasing of points and lines. Also we will render the points to be round rather than a square. This is implementation dependent unfortunately, may slow down rendering considerably.

glEnable(GL_POINT_SMOOTH);
glEnable(GL_LINE_SMOOTH);
glHint(GL_POINT_SMOOTH_HINT, GL_NICEST); // Make round points, not square points glHint(GL_LINE_SMOOTH_HINT, GL_NICEST); // Antialias the lines glEnable(GL_BLEND); glBlendFunc(GL_SRC_ALPHA, GL_ONE_MINUS_SRC_ALPHA);

5. Delete the Lines

We have restricted the no of points to be drawn on screen. The variable named 'MaxNumPts'  will have the value to max no points to be shown on screen. As the points crosses this number the first point and line got deleted, this continues further. To process this we have a callback function which removes the points (similar to adding the points). To make this Opengl mouse click position example more interesting, a keyboard function is added. This function will give another interaction with user. Following is the uses -

 Sl. No. Key Functionality
1 a Switch between aliasing
2 esc Exit the Program
3 f Remove First Point
4 l Remove Last Point
5 t  Switch between thicknesses and size

[next]

This Program is taken from the book - 3D Computer Graphics: A Mathematical Introduction with OpenGL, by S. Buss, Cambridge University Press, 2003. The program is modified from the original version a little. The keyboard functionality of switching the alias is not working sometimes. Further you can use a switch function to  changes the thickness and size of lines and points by press the numeric keys.

 Hope you liked this opengl tutorial as well as the project. Download the source code and please comment you thoughts to us.

Monday, December 21, 2015

Drawing Bézier curves in Opengl C++

Curves in Computer graphics is one of the important topics to learn. Today we are going to learn about the about a special curve type - Bezier Curve. First we know about the curves, then what is bezier curves then we will learn drawing bezier curves in opengl.

Curves

Curves are set of indefinite set of points which need not to be straight. Curves are differently defines in mathematics, hence context will tell the proper definition. A curve can be in 2d (plane curves) or in 3d (space or Euclidean Space curves). A line is special type of curve which is straight. A curve is represented with some set of equation called the equation of curve.

Classification of Curves

There are mainly two types of curves -
  • Open Curve : The curves which have no endpoints are called open curves. Eg - Parabola, Hyperbola.
  • Closed Curve : When the curves end points are joined, they are called closed curves. Eg - Circle, Ellipse.
The curves can be further classified into three types -  implicit, explicit and parametric curves.
  • Implicit Curve - These type of curves implicitly represent the set of points on a curve which can be easily tested. The general function form is  - f(x, y) = 0. Eg.  Cricle (x2 + y2 - R2 = 0, R = Radius)
  • Explicit Curve - Curves which is explicitly represented and for each value of x there is only one y can be calculated are Explicit curves. They are generally represented with the function y = f(x). Eg. Cubic curves (Y=aX3+bx2+cx+d)
  • Parametric Curve - The curves that can be represented by parametric form, described by expressing the position of all its points as function of one parameter. The general functional form is P(t) = f(t), g(t). Eg. Bezier Curve.

Bézier Curves

Bézier curves are parametric curves that are generated with the control points. It is widely used in computer graphics and other related industry, as they appear reasonably smooth at all scales. Bézier curves was name after french engineer Pierre Bézier, who discover it. Mathematically Bézier curves is represented as -


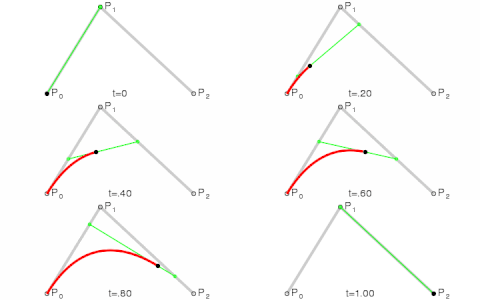
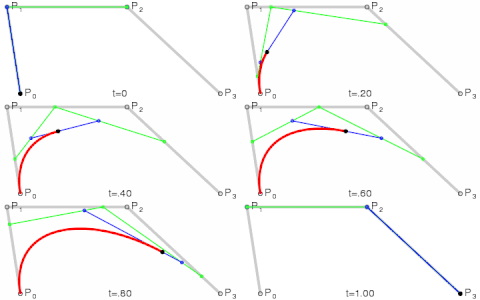
Bézier curves are of different degree - linear curves, quadratic curve, cubic curve and high order curve. See the images below taken from wikipedia.

Quadratic Bézier curves

Cubic Bézier curves

Drawing Bézier curves in opengl

To draw bezier curve opengl c++ you need to define the curve center points. First we will define a function that will compute the points of the curve. This functions is very important for drawing bezier curves in opengl. 

 void bezierCoefficients(int n, int *c)
{ int k,i; for(k=0;k<=n;k++)
{ c[k]=1; for(i=n;i>=k+1;i--)
c[k]*=i; for(i=n-k;i>=2;i--)
c[k]/=i;
 } } 

In bezier curve opengl code display function we will define an array that holds the x, y coefficients of end points. In this function only we will define the line width which will define the width of curve. The bezierCoefficients function is called, then we looped it to form the curve. We are going to use the GL_LINE_STRIP to develop the curve. In the drawing bezier curves in opengl we also need to define the glPointSize as well as set the gluOrtho2D to certain x, y values which define the curve path.

I hope you like this article showcasing the bezier curve opengl c++ and learn more about drawing the curve. Download the full bezier curve opengl code from below and tell us about it in comments.