It's Fun to lean OpenGL!
Today we are going to learn about making an WireFrame SnowMan from scratch.
Today we are going to learn about making an WireFrame SnowMan from scratch.
1. Overview
To draw a snowman in OpenGL C++, you need to first figure out the sketch line. Entire shape need to drawn with the help of proper OpenGL primitives and placed them at proper coordinate positions. So basically you need to understand the coordinate system properly.
>Shape
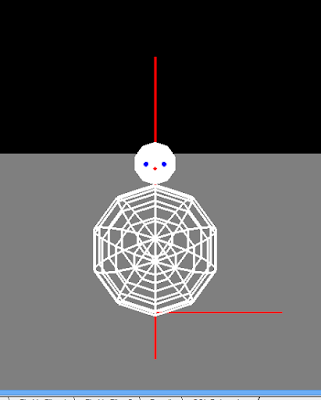
The shape of Snowman looks to be a big snowball which make body, and small ball over it which forms head. Now we have two dots over the small ball for creating eye and a conical shape for nose.
>3D Coordinates
We will draw the three lines across for each of the x, y, z axis.
>User Interaction
With this program user can move the camera position to left and right and zoom in and out.

2. Draw SnowMan
To draw snow man we use the inbuilt function opengl. To draw the big ball body part, use the glutWireSphere and glutSolidSphere. To draw the eyes use only glutSolidSphere and for nose use glutSolidCone. The color has specified before same as we do in other cases which you can change.
glColor3f(1, 1, 1);
glTranslatef(0, 0.75, 0);
glutWireSphere(0.75, 10, 10);
glTranslatef(0, 1, 0);
glutSolidSphere(0.25, 10, 10);
glPushMatrix();

//Draw eyes
glTranslatef(0.1, 0, 0.23);
glColor3f(0, 0, 1);
glutSolidSphere(0.03, 10, 10);
glTranslatef(-0.2, 0, 0);
glutSolidSphere(0.03, 10, 10);

glPopMatrix();
glTranslatef(0, -0.05, 0.25);
glColor3f(1, 0, 0);
glutSolidCone(0.025, 0.25, 4, 4);
3. Keyboard Function
First define two global variable angle and zview. These will act the amount of motion or move we required when particular key is pressed. The angle will take care of movement of camera in right and left direction. For zoomin and zoomout- zview has been used. So define a keyboard function and used switch to define the input and take action accordingly. Here we will use the four navigation keys whose GLUT forms are as - GLUT_KEY_LEFT, GLUT_KEY_RIGHT, GLUT_KEY_UP, and GLUT_KEY_DOWN. Below code explains all.
void processSpecialKeys(int key, int x, int y)
{
switch (key)
{
case GLUT_KEY_LEFT:
angle -= 0.5;
break;

case GLUT_KEY_RIGHT:
angle += 0.5;
break;

case GLUT_KEY_UP:
zView -= 0.5;
break;

case GLUT_KEY_DOWN:
zView += 0.5;
break;
}
}
3. Display Function
We have drawn all the things and put the action for camera movement. One thing we will do in display function is draw the x, y, z axis lines in red color. Now also call all the function which allow OpenGL to display objects on the screen that is drawsnow etc.
void display(void)
{
glClear(GL_COLOR_BUFFER_BIT | GL_DEPTH_BUFFER_BIT);
glMatrixMode(GL_MODELVIEW);
glLoadIdentity();

gluLookAt(xView, yView, zView,
xView + lx, yView + ly, zView + lz,
0, 1, 0);
glRotatef(angle, 0, 1, 0);

glColor3f(1, 0, 0);
glLineWidth(3);
glBegin(GL_LINES);
glVertex3f(0, 0, 0);
glVertex3f(1.5, 0, 0);
glVertex3f(0, 0, 0);
glVertex3f(0, 3, 0);
glVertex3f(0, 0, 0);
glVertex3f(0, 0, 1.5);
glEnd();

glColor3f(0.5, 0.5, 0.5);
glBegin(GL_QUADS);
glVertex3f(-100, 0, -100);
glVertex3f(-100, 0, 100);
glVertex3f(100, 0, 100);
glVertex3f(100, 0, -100);
glEnd();

drawSnowMan();

glutSwapBuffers();

}
4. Main Function
Finally code the main function which is essential part of any OpenGL program. You can Download the whole source code from the link given.
Share your feedback and ideas in the comment box.
No comments:
Post a Comment